Building Your Dream 6x8 Gable Shed: A Step-by-Step DIY Guide
So, you're thinking about building a shed? Fantastic! A 6x8 gable shed is a perfect size for a beginner DIYer, offering ample storage without being overwhelmingly complex. This guide will walk you through the process, step-by-step, in a way that's hopefully both informative and easy to understand. Grab your coffee, let's get started!
1. Planning and Preparation: The Foundation of Success
Before you even think about touching a single nail, some planning is crucial. This isn't rocket science, but skipping this phase often leads to headaches down the line.
1.1 Choosing Your Location
Where will your glorious shed reside? Consider factors like:
- Accessibility: Do you have a clear path to get your materials to the site?
- Sunlight and Shade: Think about how much sun exposure you want. Too much sun can lead to overheating, while too little might encourage dampness.
- Drainage: Avoid low-lying areas prone to flooding. You want a nice, level spot.
- Local Regulations: Check with your local council or homeowner's association about building permits and setbacks (minimum distance from property lines).
1.2 Gathering Your Materials
Making a detailed list is key. You don't want to be halfway through the project and realize you're missing a crucial piece! Here's a basic list (quantities depend on your design, so adjust accordingly):
- Pressure-treated lumber (4x4 posts for the foundation, 2x4s for the framing, 2x6s for the rafters)
- Plywood or OSB sheathing for the walls and roof
- Roofing material (shingles, metal, etc.)
- Nails, screws, and other fasteners
- Concrete mix (for a concrete foundation - optional, but recommended)
- Door and window materials (if desired)
- Exterior paint or stain (optional)
- Level, measuring tape, saw, hammer, drill, and other basic tools.
Consider buying slightly more materials than you need â€" it's better to have leftovers than to run short and have to make a mid-project trip to the hardware store!
2. Building the Foundation: A Solid Start
A sturdy foundation is essential. While you can get away with a simpler base on very stable ground, a concrete slab is highly recommended.
2.1 Preparing the Ground
Clear the chosen location of any vegetation, rocks, or debris. Level the ground as much as possible using a shovel and rake. Mark out the dimensions of your shed (6ft x 8ft) using stakes and string.
2.2 Pouring the Concrete Slab (Optional, but Recommended)
Dig a shallow foundation trench (about 4-6 inches deep), adding gravel for better drainage if your soil is particularly clay-like. Create a formwork using wood planks to contain the concrete. Pour the concrete mix, ensuring it's level. Let it cure for at least 24-48 hours before proceeding.
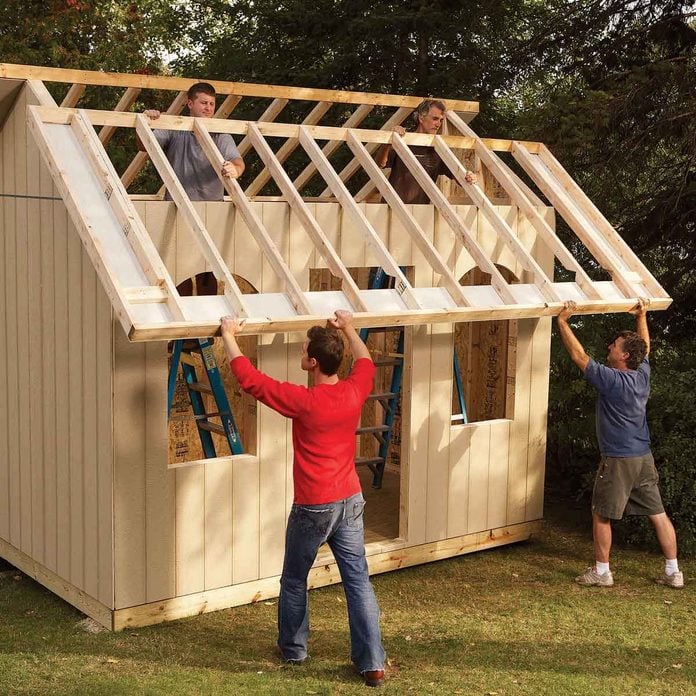
3. Framing the Walls and Roof: The Structure Takes Shape
This is where the fun begins! We'll construct the walls and the roof frame, creating the basic skeleton of your shed.
3.1 Building the Wall Frames
Cut your 2x4s to the appropriate lengths for the wall frames. Assemble them using appropriate fasteners, ensuring square corners using a speed square. Remember to leave openings for your door and windows, if applicable. Repeat this for all four walls.
3.2 Raising the Walls
Carefully lift the wall frames into position on your foundation. Secure them temporarily with bracing to ensure stability before nailing them firmly in place.
3.3 Constructing the Roof Frame
Construct the roof trusses (triangular roof supports) using 2x6 lumber. There are several ways to create trusses, so research the best method for your skills and materials. Attach the trusses to the top plates of the wall frames, ensuring they are properly aligned and spaced.
4. Sheathing and Roofing: Weather Protection
Now it's time to protect your hard work from the elements!
4.1 Applying the Wall Sheathing
Cover the exterior of the wall frames with plywood or OSB sheathing. Ensure proper overlapping and secure fastening for a solid, weather-resistant surface.
4.2 Installing the Roofing
Install your chosen roofing material according to the manufacturer's instructions. This will likely involve laying down underlayment for added protection before applying the shingles or other roofing material.
5. Finishing Touches: Adding the Finishing Touches
The finishing touches transform your basic shed into a functional and attractive storage space.
5.1 Installing Doors and Windows
If you have chosen to include them, carefully install your doors and windows, ensuring they are properly sealed and weatherproof.
5.2 Adding Trim and Fascia
Enhance the look and weather protection of your shed with trim around doors, windows, and along the roofline. Install fascia boards along the edges of the roof.
5.3 Painting or Staining (Optional)
Protect and beautify your shed by applying a coat of exterior paint or stain. This not only improves aesthetics, but also adds an extra layer of weather protection.
Commonly Asked Questions
Q: Do I need a building permit?
A: This depends on your local regulations. Check with your local council or homeowner's association before starting your project.
Q: What type of foundation is best?
A: A concrete slab is the most durable and recommended, especially if you live in an area with variable weather conditions. However, a simple gravel base might suffice for smaller, less substantial structures.
Q: What kind of wood should I use?
A: Pressure-treated lumber is highly recommended for its resistance to rot and insects, especially for the foundation and parts in direct contact with the ground.
Q: How long will it take to build?
A: The time needed depends on your experience and the complexity of your design. Allow for several days, possibly a weekend per major step. Don't rush the process!
Q: Can I do this alone?
A: While possible, having a helper, especially during the wall-raising and roofing stages, will make the process significantly easier and safer.
Remember, building a shed is a rewarding experience. Take your time, follow safety guidelines, and don’t be afraid to ask for help if you need it. Enjoy the process and the satisfaction of creating something with your own two hands!
0 comments:
Post a Comment