Friday, November 22, 2024

How to Make a Lean-To Shed DIY: A Budget-Friendly Outdoor Project

How to Make a Lean-To Shed DIY: A Budget-Friendly Outdoor Project

How to Make a Lean-To Shed DIY: A Budget-Friendly Outdoor Project

Constructing a lean-to shed offers a practical and cost-effective solution for expanding outdoor storage or creating a sheltered workspace. This detailed guide provides a comprehensive overview of the process, emphasizing budget-friendly techniques and materials selection while maintaining structural integrity and durability.

Phase 1: Planning and Preparation

Before commencing construction, meticulous planning is crucial to ensure a successful outcome. This involves several key steps:

Site Selection and Assessment

Choosing the appropriate location is paramount. Consider factors such as:

  • Accessibility: Ensure easy access for materials delivery and future use.
  • Ground Conditions: Evaluate the terrain for stability and drainage. Level ground is ideal, minimizing excavation and foundation complexities.
  • Sunlight and Shade: Determine the desired level of sunlight exposure for the shed’s intended purpose. Consider the impact of sun and shade on temperature regulation.
  • Proximity to Utilities: Maintain sufficient distance from power lines, gas meters, and other utilities to prevent accidental damage or interference.

Design and Dimensions

The dimensions of your lean-to will depend on your storage needs and available space. Sketch a detailed plan, noting the length, width, and height of the structure. Consider the following aspects:

  • Roof Slope: A steeper slope facilitates better water runoff, especially in areas with high rainfall.
  • Wall Height: Determine the desired height of the side walls for comfortable access and storage.
  • Door Placement: Strategically plan the placement of the door for ease of access and efficient space utilization.

Materials Procurement

Selecting cost-effective yet durable materials is essential for a budget-friendly project. Consider the following:

  • Pressure-Treated Lumber: Opt for pressure-treated lumber for the foundation and framing to enhance resistance against rot and insect infestation. This is a worthwhile investment despite the higher initial cost.
  • Plywood or OSB Sheathing: Plywood or oriented strand board (OSB) provides a cost-effective solution for wall and roof sheathing. Ensure you select the appropriate grade for exterior use.
  • Roofing Material: Choose a roofing material that suits your budget and climate. Options include asphalt shingles, corrugated metal sheets, or recycled plastic roofing.
  • Fasteners: Use galvanized or stainless steel nails and screws to ensure longevity and resistance to rust.

Phase 2: Construction

With planning complete, the construction phase begins. This involves several key steps:

Foundation Preparation

A stable foundation is crucial for the longevity of your lean-to shed. For a budget-friendly approach, consider these options:

  • Gravel Base: A simple and cost-effective option is to create a gravel base, ensuring proper drainage. Level the ground, and lay down a layer of gravel several inches deep. Compress the gravel thoroughly to provide a stable foundation.
  • Concrete Piers: For increased stability, especially in soft soil, pour small concrete piers at strategic locations along the shed's base.

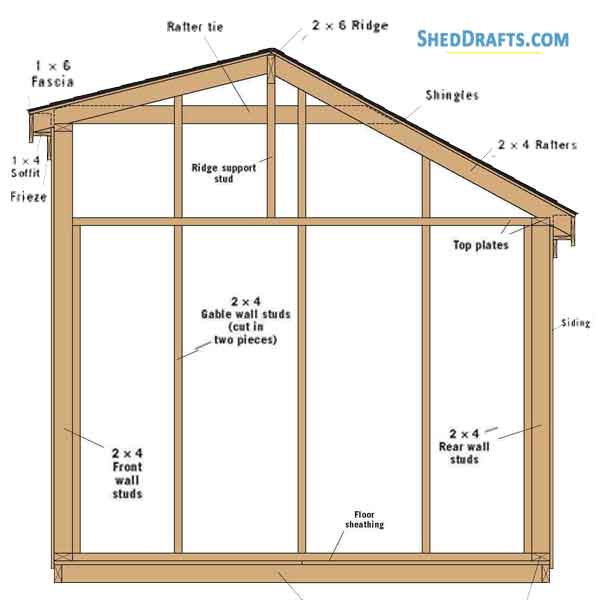
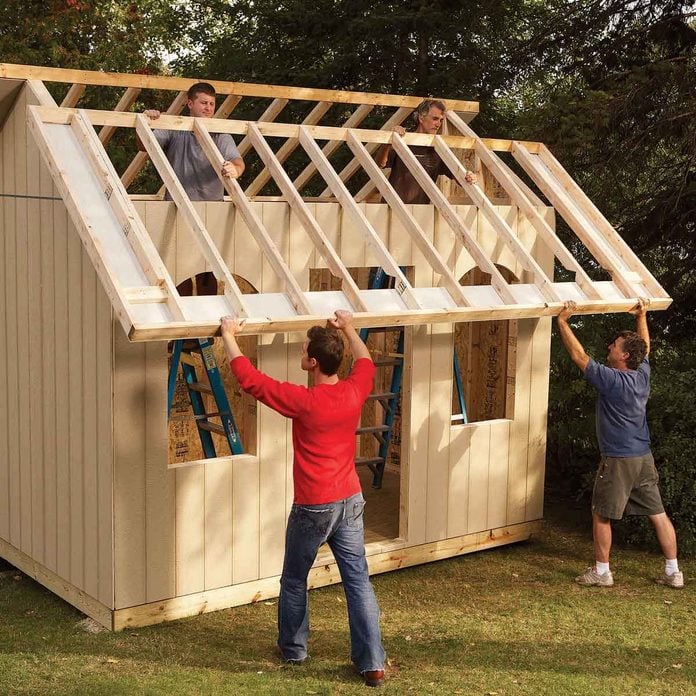
Framing the Structure

The framing forms the skeletal structure of your lean-to. Begin by building the foundation wall framework. This typically involves creating a frame using pressure-treated lumber. Ensure that the frame is square and level using a level and measuring tape. Once the foundation is complete, erect the supporting posts for the roof. These posts should be firmly anchored into the ground or the foundation. The roof rafters should then be carefully attached to the supporting posts and the foundation wall.

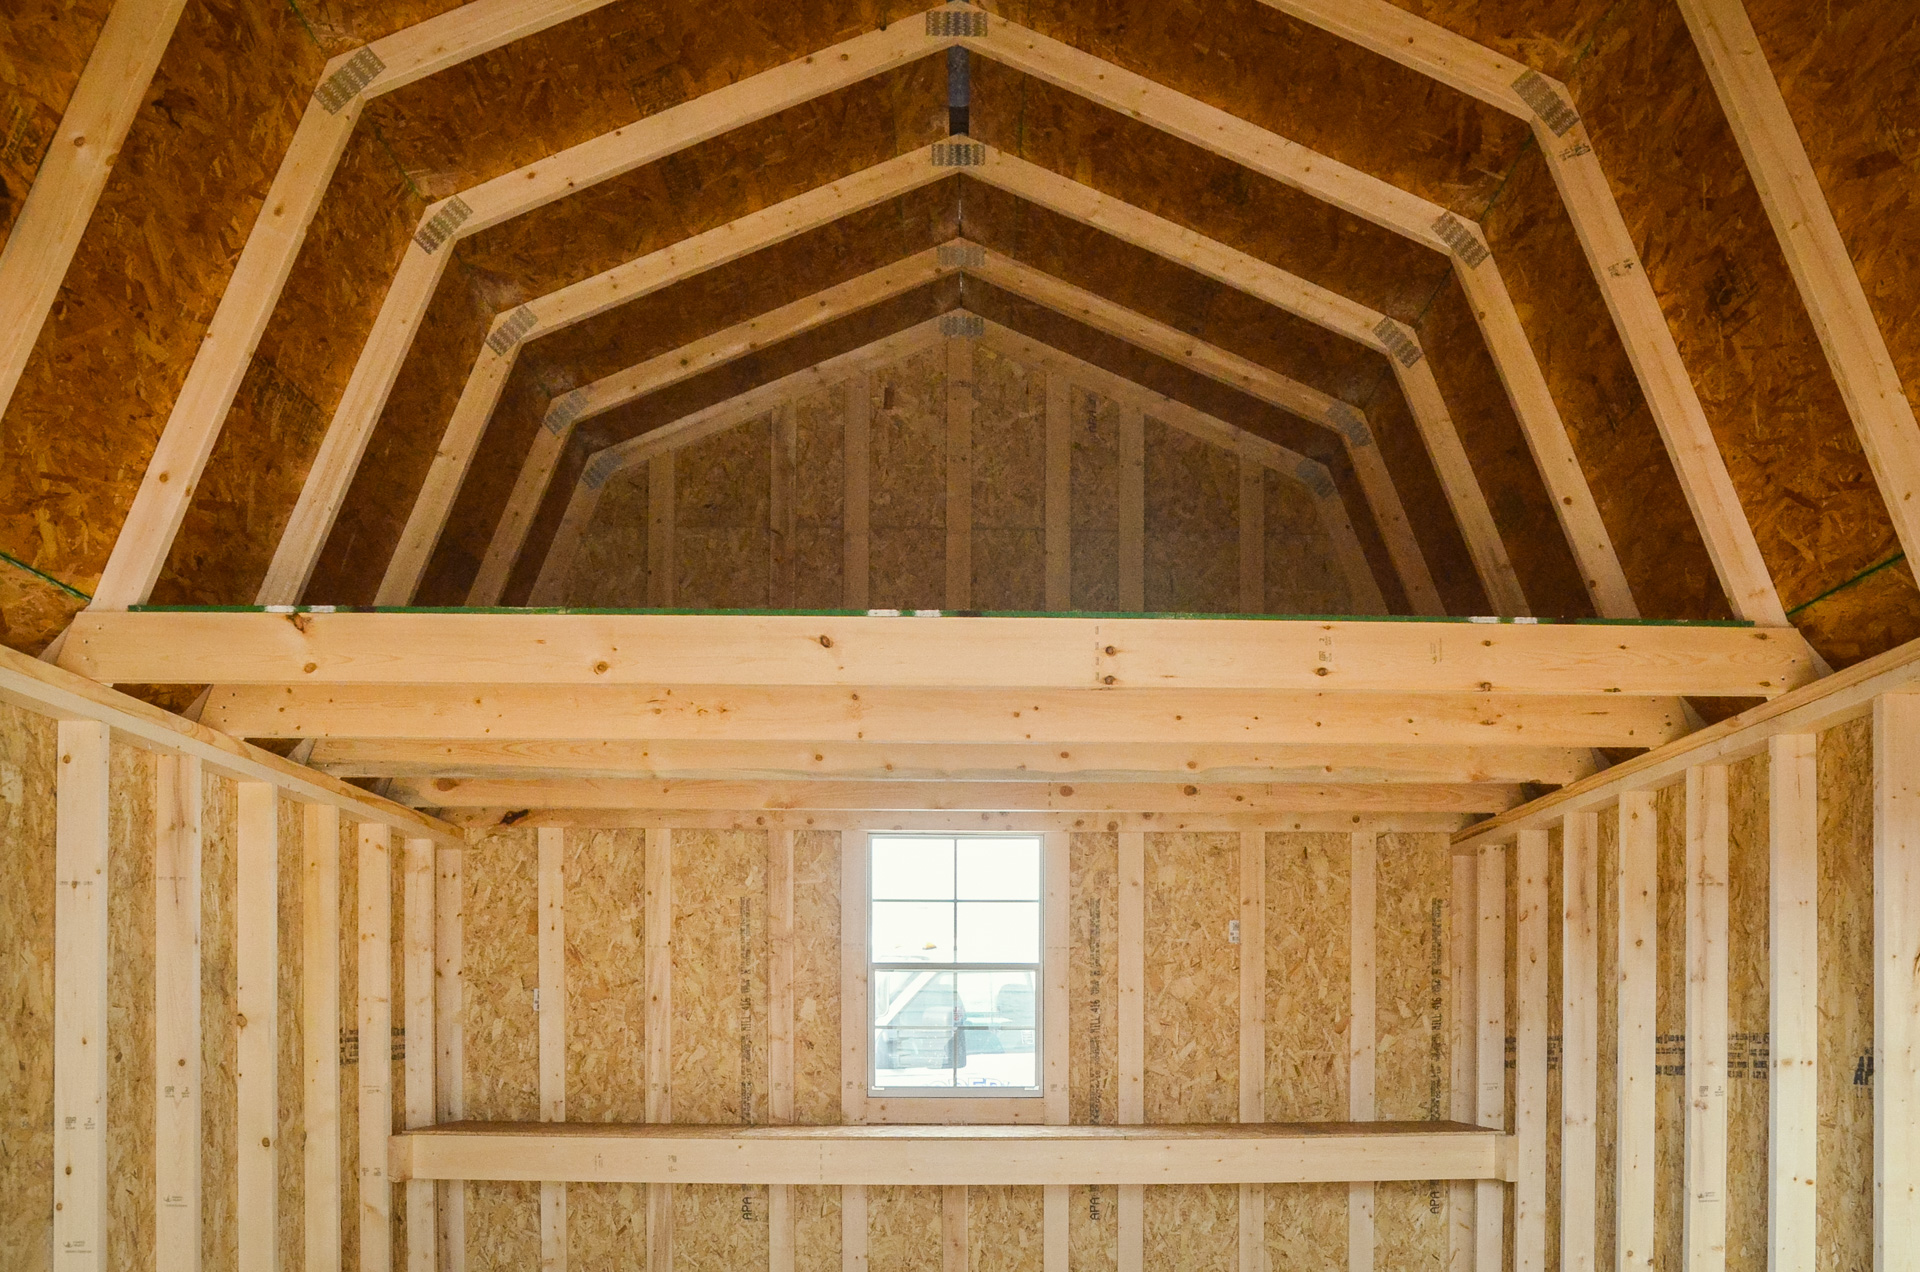
Sheathing the Walls and Roof

Once the frame is erected, attach the plywood or OSB sheathing to the walls and roof. Ensure proper alignment and secure fastening to prevent movement. This step provides a solid surface for the exterior cladding.

Roofing Installation

The roofing is a crucial element protecting your shed from the elements. Begin by installing underlayment to provide an additional barrier against moisture. Then, install your chosen roofing material according to the manufacturer's instructions. Ensure proper overlapping and sealing to prevent leaks. Pay close attention to flashing around any penetrations, such as vents or chimneys, if applicable.

Door and Window Installation (Optional)

If you’re including a door and/or windows, this is the time to install them. Ensure that the openings are properly framed and sealed to prevent drafts and moisture intrusion.

Phase 3: Finishing Touches

The final steps enhance the appearance and functionality of your lean-to shed.

Exterior Finishing

Consider applying a weather-resistant sealant or paint to protect the wood from the elements and enhance the aesthetic appeal. Choose a paint formulated for exterior use and follow the manufacturer's instructions carefully.

Interior Finishing (Optional)

If you intend to use the shed for more than simple storage, consider adding interior finishes. This could involve painting the interior walls, adding shelving, or installing a work bench.

Safety Considerations

Throughout the construction process, prioritize safety. Wear appropriate personal protective equipment (PPE), including safety glasses, work gloves, and sturdy footwear. Ensure that all tools and equipment are used correctly and safely. If working at heights, use proper fall protection. Always adhere to local building codes and regulations.

By following these steps and employing budget-conscious strategies, you can successfully construct a durable and functional lean-to shed that meets your needs while staying within your budget. Remember to always prioritize safety and carefully review all instructions before beginning the project. A well-planned and executed project will provide years of useful outdoor storage or workspace.

Thursday, November 21, 2024

DIY Small Pallet Shed Plans for Your Outdoor Storage Needs

DIY Small Pallet Shed Plans for Your Outdoor Storage Needs

DIY Small Pallet Shed Plans for Your Outdoor Storage Needs

Hey there, fellow DIY enthusiasts! Are you tired of that overflowing garden shed, or maybe you just need a little extra storage space for your outdoor gear? Building your own small pallet shed is a fantastic way to solve those problems while flexing your creative muscles and saving a bunch of money. This isn't some super-complex carpentry project; even a beginner can tackle this with a little patience and these easy-to-follow plans. Let's get started!

Planning Your Pallet Shed: The Foundation of Success

Before you even think about grabbing a hammer, we need to plan this out. Think of this phase as laying the groundwork for a masterpiece (or at least a really useful shed!).

Choosing Your Pallets

This is crucial! Not all pallets are created equal. You want pallets that are sturdy, relatively clean, and free from rot or significant damage. Heat-treated pallets are your best bet, as they're less likely to contain nasty pests. Avoid chemically treated pallets (look for the "HT" stamp). You might need anywhere from 6 to 10 pallets depending on the size of your shed. It’s always better to have a few extra on hand, just in case!

Location, Location, Location

Where will your glorious pallet shed reside? Choose a level spot that's easily accessible. Consider drainage â€" you don't want your shed sitting in a puddle! Make sure you have enough clearance around the shed for easy access and to avoid blocking pathways.

Size and Design

Let's get down to brass tacks â€" how big do you want your shed? A small shed (think 4ft x 6ft) is a manageable project for a first-timer. Sketch a quick design. You can keep it simple, or get creative with a little gabled roof or a slightly more complex design. The internet is your oyster here â€" search for "small pallet shed designs" for inspiration!

Gathering Your Tools and Materials

Besides your pallets, you'll need a few essential tools and materials:

  • Hammer or Nail Gun (a nail gun will save you a lot of time and effort)
  • Screws (exterior-grade are a must)
  • Measuring Tape
  • Level
  • Saw (circular saw is ideal, but a hand saw will work)
  • Safety Glasses and Gloves (protect yourself!)
  • Optional: Roofing felt or metal roofing sheets
  • Optional: Exterior paint or wood stain (to protect your shed from the elements)

Remember to always prioritize safety! Wearing appropriate safety gear is non-negotiable.

Building Your Pallet Shed: Step-by-Step Guide

Alright, let's build! This is a general guide, remember to adapt it to your specific design.

The Base

You'll want a sturdy base for your shed. You can create a simple base using concrete blocks or treated lumber. If you're on a super tight budget, you can even use more pallets to create a raised base, just ensure they are very stable and level. Make sure the base is level â€" this will prevent future headaches!

The Walls

Start assembling the walls of your shed by standing pallets upright and attaching them together with screws. You can create a single-wall design or even a double-wall if you want a more insulated shed. Ensure the pallets are tightly secured and that your corners are square. A level is your best friend here!

The Roof

The roof is where you can get creative! A simple flat roof is the easiest to construct, but a gabled roof adds a nice touch. You can use more pallets to create the roof frame, and then cover it with roofing felt or metal roofing sheets for weather protection. Consider the local climate; a steeper roof is better in areas with lots of snow.

Finishing Touches

Once your shed is structurally sound, it's time to personalize it! You can add a door (using more pallet wood or even repurposed materials), windows (if you're feeling ambitious), and even a little paint or stain to protect the wood and give it a finished look. Consider adding some simple shelves inside to maximize your storage space. Let your creativity run wild!

Tips and Tricks for Pallet Shed Success

Here are a few things I wish I’d known before starting my first pallet shed project:

  • Pre-treat your pallets: Give your pallets a good cleaning and consider applying a wood preservative before assembling the shed to protect them from the elements and pests.
  • Use the right fasteners: Exterior-grade screws are a must. They’ll withstand the weather and last much longer than nails.
  • Don’t be afraid to ask for help: Building a shed is much easier with a friend or family member to lend a hand (and maybe hold the level!).
  • Take your time: Rushing the project could lead to mistakes. Take breaks when needed and enjoy the process.

Frequently Asked Questions

Let's address some common queries about DIY pallet sheds:

How long does it take to build a small pallet shed?

Depending on your experience and the complexity of your design, you could finish it in a weekend or it might take a few weekends. It all depends on the time you want to spend on it per session

How much does it cost to build a pallet shed?

The beauty of using pallets is that it's incredibly budget-friendly! The cost mainly comes from the fasteners, roofing materials (if any), and any additional materials you decide to add. You could build a basic shed for under $100, depending on your resources and location.

Are pallet sheds durable?

With proper construction and maintenance, a pallet shed can be surprisingly durable. Using treated pallets and applying a protective sealant will significantly extend its lifespan. It won't last forever, but it offers a great value for the effort involved.

Do I need planning permission to build a pallet shed?

This depends on your local regulations. Check with your local council or planning department to see if you need any permits before starting your project. Usually, small sheds don't require planning permission, but it’s always better to be sure.

So there you have it â€" a comprehensive guide to building your own small pallet shed. Remember to have fun, be creative, and don't be afraid to experiment! Happy building!

DIY Small Pallet Shed: Practical Plans for a Functional Shed

DIY Small Pallet Shed: Practical Plans for a Functional Shed

DIY Small Pallet Shed: Practical Plans for a Functional Shed

Hey there, fellow DIY enthusiasts! So, you're dreaming of a cute little shed, but the price tags at the hardware store are making your eyes water? Don't worry, you're not alone! Building your own shed from reclaimed pallets is a fantastically budget-friendly and surprisingly straightforward project. Let's dive into how you can build your own small pallet shed, step by step. I'll walk you through everything, from planning to the final touches. Get ready to get your hands dirty!

Planning Your Pallet Paradise: Size and Location

Before you even think about hammering a single nail, you need a plan. And the first part of that plan is figuring out the size and location of your future shed.

Size Matters (and So Does Your Yard!)

Think about what you want to store in your shed. Are you aiming for a mini-tool shed, a potting station for your green thumb, or something else entirely? A smaller shed (say, 4ft x 6ft) is perfect for basic tools and garden supplies. Anything bigger will require more materials and more time. Measure your yard carefully to make sure you have enough space, leaving enough room for access. Remember you'll need space around the shed for easy access and maintenance.

Location, Location, Location!

Choose a level spot for your shed. Uneven ground will make building a lot harder, and your shed might end up wobbly. Consider sun exposure and access to power if you plan on using electricity inside. Avoid placing the shed too close to trees or overhanging branches, which could cause problems later on. Check local building codes and regulations to ensure your shed meets any requirements in your area. This might include setbacks from property lines or height restrictions. It’s better to be safe than sorry!

Gathering Your Materials: The Pallet Powerhouse

The beauty of a pallet shed is that the main material is free (or very cheap)! Let's talk pallets.

Sourcing Your Pallets

You can find free pallets behind businesses, construction sites, or even on Craigslist or Facebook Marketplace. Just be careful â€" some pallets might be treated with chemicals, which you don't want near your plants or stored items. Look for heat-treated pallets (marked with "HT" or an IPPC stamp), which are generally safe. Remember to always ask permission before taking pallets from a business or construction site. And be sure the pallets are structurally sound with no major damage.

Beyond Pallets: The Supporting Cast

While pallets are the stars of the show, you'll need other materials to complete your shed:
  • Concrete blocks or a suitable foundation: These will keep your shed stable and prevent rot.
  • Screws and nails: Opt for exterior-grade screws and galvanized nails to withstand the elements.
  • Wood sealant or paint: Protect your shed from the weather.
  • Plywood or OSB for the roof: This will provide a weather-tight covering.
  • Roofing felt or shingles: For extra protection from rain and snow.
  • Door hinges and a latch: To keep your belongings safe and secure.
  • Optional: Windows, shelves, and a floor.

Building Your Pallet Masterpiece: A Step-by-Step Guide

This is where the fun (and work) really begins! This is a general guide, so you might need to adapt it to your specific pallet sizes and shed design.

Laying the Foundation

Start by leveling the ground and placing your concrete blocks or chosen foundation. This provides a stable base for your shed. Ensure they are spaced to accommodate your pallet walls.

Constructing the Walls

This is the most time-consuming part. Carefully inspect your pallets for any loose boards or damage and secure them as needed. You'll likely need to disassemble some pallets to get the right pieces for your walls. Attach the pallets vertically to form the walls, screwing them together securely. Remember to leave space for a door. You can create a frame for your door using extra pallet wood.

Building the Roof

Once the walls are standing, it's time for the roof. You can use simple gable roof design, or even a flat roof if your shed is small. Attach rafters made from sturdy pallet wood or lumber, then cover with your chosen plywood or OSB sheets. Finally, add roofing felt or shingles for waterproofing.

Adding the Finishing Touches

Hang your door, add any windows or shelves, and secure the roof with appropriate sealant or flashing. Apply a coat of wood sealant or paint to protect your shed and add some personality.

Maintenance and Care for Your Pallet Shed

Your hard work deserves a little TLC! Regular maintenance will extend the life of your shed and keep it looking great.
  • Regular inspections: Check for loose boards, damage to the roof, or any signs of pest infestation.
  • Seasonal cleaning: Clean out debris and sweep the floor regularly.
  • Re-sealing/repainting: Reapply sealant or paint as needed, especially after harsh weather.

Frequently Asked Questions

Q: How long does it take to build a pallet shed?

A: This depends on the size and complexity of your shed. Expect to spend anywhere from a weekend to a few weekends for a small shed.

Q: Do I need any special tools?

A: A basic set of tools, including a hammer, screwdriver, saw, drill, and level, will do. A pry bar is also helpful for disassembling pallets.

Q: Can I use treated pallets?

A: While you can, it's generally recommended to avoid using chemically treated pallets, especially if you'll be storing food or plants in the shed.

Q: How much does it cost to build a pallet shed?

A: The cost will largely depend on the size of your shed and the additional materials you need. The biggest savings come from using free or very cheap pallets.

Q: How long will a pallet shed last?

A: With proper construction and maintenance, a pallet shed can last for several years. However, pallets are not designed for long-term outdoor use, so it’s important to properly treat the wood and perform routine maintenance.

And there you have it! Building a small pallet shed is a rewarding experience. It's a fantastic way to add functional storage to your yard while saving money and being environmentally conscious. So grab your tools, gather your pallets, and let your creativity flow! Remember safety first â€" always wear appropriate safety gear. Happy building!

Step-by-Step Lean-To Shed Build: Practical Plans for a DIY Shed

Step-by-Step Lean-To Shed Build: Practical Plans for a DIY Shed

Step-by-Step Lean-To Shed Build: Practical Plans for a DIY Shed

So, you're thinking about building a lean-to shed? Fantastic! It's a super satisfying project, and way more achievable than you might think. This guide will walk you through building your own lean-to, from planning to the final touches. Think of me as your friendly neighborhood shed-building buddy, here to help you every step of the way. Let's get started!

1. Planning Your Lean-To Shed: Dream Big, Then Adjust

Before you even think about grabbing a hammer, let's get the planning sorted. This is crucial to avoid headaches (and wasted materials) down the line.

1.1 Defining Your Needs and Size

What will you be using your shed for? Storing gardening tools? Bikes? A workshop? The purpose dictates the size. Start with your ideal dimensions, but be realistic. A smaller shed is easier and cheaper to build. Think about access â€" will you need a door wide enough for your lawnmower? Measure twice, cut once (a cliché, but a very true one!).

1.2 Choosing the Right Location

Where will your lean-to live? Consider these factors:

  • Proximity to the house or existing structure: This is a lean-to, after all, so it needs something to lean on!
  • Sunlight and shade: Think about ventilation and potential moisture issues.
  • Ground conditions: Is the ground level? Will you need to level it? A slightly sloped area might even help with drainage.
  • Access to utilities: If you plan on electricity or water, consider proximity.

1.3 Materials List: Getting Organized

This is where things get a bit more specific. You’ll need a detailed list, and it will vary depending on your shed's size and design. However, here’s a general idea:

  • Pressure-treated lumber for the frame (posts, beams, rafters)
  • Plywood or OSB for the walls and roof
  • Roofing felt or shingles
  • Concrete blocks or pier footings for the foundation (if needed)
  • Nails, screws, and other fasteners
  • Door and window materials (if applicable)
  • Paint or stain (optional)

Get a few extra of everything. It’s always better to have a little left over than to run short mid-project.

2. Building the Foundation: A Solid Start

A stable foundation is essential for a long-lasting shed.

2.1 Preparing the Ground

Clear the area of any debris, grass, or rocks. Level the ground as best as you can â€" you might need to dig out some areas and add topsoil in others. A spirit level will be your best friend here.

2.2 Creating the Foundation

Your foundation choice depends on your soil and shed size. For smaller lean-tos, concrete blocks laid on a compacted gravel base are often sufficient. For larger or heavier sheds, concrete pier footings offer better support. If you're unsure, consult a local builder or home improvement expert.

3. Framing the Lean-To: The Skeleton

Time to build the frame! This is where your measurements from the planning stage really pay off.

3.1 Erecting the Posts and Beams

This involves attaching the vertical posts to the existing structure (your house or wall) and securing horizontal beams to the posts. Ensure everything is plumb and level using a level and plumb bob. Use appropriate fasteners â€" long screws or bolts are better than nails for this part.

3.2 Installing the Rafters

The rafters are the angled supports that form the roof. Spacing them correctly is key for a strong and stable roof. Use a rafter square to ensure accurate cuts for proper support and avoid sagging.

4. Sheathing and Roofing: Protecting Your Investment

The fun part (almost!) â€" giving your shed a solid exterior.

4.1 Attaching the Sheathing

Attach your chosen sheathing (plywood or OSB) to the frame. Ensure proper overlap and secure fastening. This will provide a solid base for the roof covering.

4.2 Applying the Roofing Material

This step depends on your chosen roofing material. Whether it’s shingles, roofing felt, or metal roofing, follow the manufacturer's instructions carefully. Proper installation is vital for waterproofing and longevity.

5. Finishing Touches: The Details

Adding the finishing touches transforms your framework into a usable shed.

5.1 Installing Doors and Windows

If you're incorporating doors or windows, this is the time to install them. Use weatherstripping to ensure a good seal against drafts and moisture.

5.2 Painting or Staining (Optional)

A final coat of paint or stain not only enhances the appearance but also protects the wood from the elements.

6. Clean Up and Enjoy!

After the building is done, clean up any leftover materials and give your new lean-to a good once-over. Admire your handiwork! You've built your own shed â€" congratulations!

Commonly Asked Questions

Here are some questions people often ask about building lean-to sheds:

Q: Do I need a permit to build a lean-to shed?

A: Building codes vary by location. Check with your local building department to see if a permit is required. It's usually dependent on the size and complexity of the structure.

Q: How long does it take to build a lean-to shed?

A: This depends on your experience, the size of the shed, and weather conditions. A small, simple lean-to could take a weekend, while a larger, more complex one might take several weekends.

Q: What's the best type of wood to use?

A: Pressure-treated lumber is highly recommended for its durability and resistance to rot and insects. Pine is a common and relatively affordable choice.

Q: How much does it cost to build a lean-to shed?

A: The cost varies significantly based on size, materials, and your labor costs (if you're doing it yourself). You can expect to spend anywhere from a few hundred to several thousand dollars.

Q: Can I build a lean-to shed on uneven ground?

A: While it’s best to build on level ground, you can level the area with gravel and compacted soil. For significantly uneven ground, you may need to hire a professional.

Remember, this guide is a starting point. Always consult with professionals when needed, and don't hesitate to ask questions. Happy building!

From Start to Finish: Building a Lean-To Shed for Every DIY Enthusiast

From Start to Finish: Building a Lean-To Shed for Every DIY Enthusiast

From Start to Finish: Building a Lean-To Shed for Every DIY Enthusiast

Dreaming of extra storage space but dreading the complexity of a full shed build? A lean-to shed offers a fantastic compromise: ample storage with a significantly simpler construction process. This guide walks you through each step, empowering you to build your own lean-to, regardless of your DIY experience. We’ll tackle everything from initial planning to the finishing touches, ensuring you end up with a sturdy, functional, and aesthetically pleasing addition to your property.

Phase 1: Planning and Preparation

Before you even touch a tool, thorough planning is crucial. This stage sets the foundation for a successful build. Begin by determining the ideal location for your lean-to. Consider proximity to your house or other structures for easy access and minimize disruption. Note existing features like power lines, underground utilities, and drainage patterns to avoid costly complications later on. Next, decide on the dimensions. Think about the storage needs you intend to meet and sketch a simple plan. A lean-to's size is generally dictated by its supporting wallâ€"it's often a good idea to attach it to an existing structure. Finally, source your materials. Create a detailed list including lumber (pressure-treated is best for longevity), roofing materials, fasteners (nails, screws, and possibly concrete anchors), and any other necessary hardware. Don't forget safety gear: work gloves, safety glasses, and hearing protection are essential.

Choosing the Right Materials

The longevity and strength of your lean-to depend heavily on the quality of your materials. Opt for pressure-treated lumber for the frame to withstand the elements. Consider the roofing material carefully â€" asphalt shingles are a popular and relatively inexpensive option, while metal roofing offers superior durability. Always buy slightly more materials than your calculations suggest to account for cuts, mistakes, and potential damage.

Phase 2: Foundation and Framing

With your materials gathered and plan finalized, it’s time to build the foundation. For a lean-to, a simple concrete slab or a compacted gravel base works well. The latter is quicker and cheaper but offers less stability. Ensure your chosen foundation is level and large enough to support the weight of the shed. Next, erect the framing. Start by attaching the base plates to your existing structure or the foundation. Then, construct the vertical support posts and securely attach them to the base plates. Remember to check for plumb using a level at every stage to ensure a stable structure. Carefully measure and cut the rafters, ensuring they are properly spaced and secured to both the support posts and the top plate. Properly bracing the frame is essential for stability.

Securing the Frame

Use galvanized nails or screws for superior durability and rust resistance. Pre-drill pilot holes in the lumber to prevent splitting. Consider using metal brackets or connectors at crucial joints for extra strength and to make the structure more resistant to movement or shifting over time.

Phase 3: Roofing and Finishing

Once the frame is complete and inspected, it's time to install the roofing. Start by laying down roofing felt or underlayment to create a waterproof barrier. This protects the structure from moisture damage and enhances the lifespan of the roofing material. Then, carefully install your chosen roofing material, following the manufacturer's instructions. Ensure proper overlap and secure each piece with nails or screws. After the roofing, you can add siding if desired. This improves aesthetics and offers additional weather protection. Finally, consider adding a door (if not leaning against an existing structure) and any necessary shelving or internal supports.

Adding the Finishing Touches

Consider painting or staining the exterior wood to protect it from the elements and enhance its appearance. Adding gutters can help manage rainwater runoff. If you're planning to use the lean-to for more sensitive items, think about adding extra insulation or weather stripping.

Phase 4: Inspection and Enjoyment

Before loading your lean-to with possessions, take a final walk-through to inspect your handiwork. Check for any loose nails, gaps in the roofing, or any other potential issues. Addressing these minor problems now will prevent larger issues later. Once you are satisfied, it’s time to enjoy your newly built lean-to! Fill it with your garden tools, sporting equipment, or anything else that needs a secure and dry place to reside. You've successfully completed a rewarding DIY project, adding both function and value to your property.

Remember: Safety First! Always follow safety guidelines and wear appropriate protective gear. If you're unsure about any step, consult with a qualified builder or contractor.

How to Build a Lean-To Shed That Enhances Your Outdoor Aesthetic

How to Build a Lean-To Shed That Enhances Your Outdoor Aesthetic

Building a Lean-To Shed That Elevates Your Outdoor Space

Tired of clutter overwhelming your backyard? Yearning for a charming and functional addition to your outdoor aesthetic? A lean-to shed offers the perfect solution. This simple structure, nestled against an existing wall (like your house or a sturdy fence), maximizes space and minimizes construction complexity. But building a lean-to isn't just about practicality; it's about enhancing your outdoor living area. This guide walks you through the process of crafting a visually appealing and highly functional lean-to shed that seamlessly integrates with your existing landscape.

Planning Your Dream Lean-To: Form Follows Function (and Style!)

Before you even pick up a hammer, careful planning ensures success. Start by determining your shed's purpose. Will it house gardening tools, bicycles, or serve as a cozy outdoor workspace? This dictates its size and internal features. Consider the existing structure you'll lean it against; its strength and aesthetic will influence your design choices. Next, sketch your design. Explore different roof styles â€" a simple gable roof offers classic charm, while a shed roof provides a more modern feel. Don't forget to factor in local building codes and obtain necessary permits before you begin.

Choosing the Right Materials: A Blend of Durability and Beauty

Material selection dramatically affects both the functionality and the aesthetic appeal of your lean-to. For the framing, pressure-treated lumber provides excellent durability and resistance to rot and pests. Consider using cedar or redwood for a more natural, rustic look, though these require more maintenance. For the roofing, asphalt shingles offer a cost-effective and widely available option. However, you can also explore more aesthetically pleasing alternatives like metal roofing for a modern feel, or even reclaimed wood for a truly unique character. Remember to select materials that complement your home and existing landscape.

Construction: A Step-by-Step Guide to Building Your Lean-To

With your plans finalized and materials gathered, it's time to build! Begin by preparing the base. A level concrete slab offers the most stable foundation. Alternatively, you can create a gravel base for a more rustic look. Next, erect the framing, ensuring plumb and level construction. Remember to use appropriate fasteners and connectors for strength and stability. Once the framing is complete, install the roofing, working carefully to ensure proper overlap and waterproofing. Finally, finish the exterior with your chosen siding material and add any desired features, such as windows or a door.

Adding the Finishing Touches: Enhancing the Aesthetic Appeal

The details truly make the difference. Consider adding decorative trim to enhance the architectural details of your lean-to. A coat of paint or stain can personalize the shed and blend it seamlessly with your surroundings. You can also choose to add climbing plants to soften the structure's edges and create a more natural, integrated feel. Finally, consider adding functional elements like strategically placed lighting for evening use or a weather-resistant countertop for an outdoor workspace.

Beyond the Basics: Creative Lean-To Design Ideas

Let your creativity shine! Don't be afraid to experiment with different design elements to create a truly unique lean-to shed. Consider these inspiring ideas:

  • Incorporate recycled materials: Repurpose old pallets or reclaimed wood for a unique, eco-friendly aesthetic.
  • Add a pergola extension: Extend the roofline to create a covered patio area.
  • Install a charming Dutch door: Offer easy access while maintaining privacy.
  • Create a green roof: Plant succulents or sedum on the roof for added insulation and curb appeal.

Building a lean-to shed isn't just about adding storage; it's about enhancing your outdoor living space. By carefully planning, selecting appropriate materials, and adding personal touches, you can create a beautiful and functional structure that seamlessly integrates with your landscape and elevates your outdoor aesthetic.

How to Make a Wood Pallet Shed That Will Last Through the Seasons

How to Make a Wood Pallet Shed That Will Last Through the Seasons

Building a Weather-Resistant Pallet Shed: A Seasoned Guide

Dreaming of a charming, rustic shed built from reclaimed wood pallets? Forget flimsy structures that crumble at the first sign of rain! This guide shows you how to construct a durable pallet shed that will withstand the harshest weather conditions, providing years of reliable storage. We’ll delve into every step, from selecting the right pallets to sealing against the elements, ensuring your shed stands strong through all four seasons.

Choosing Your Palettes: The Foundation of Durability

The quality of your pallets directly impacts the shed’s longevity. Don't just grab any old pallets â€" inspect them carefully. Look for pallets made of heat-treated lumber (stamped with HT or ISPM15), avoiding chemically treated wood (marked with MB). Heat-treated wood is safer for your health and less likely to rot. Choose pallets with solid, unbroken boards, rejecting those with significant damage, cracks, or loose nails. Aim for pallets of consistent thickness for a more structurally sound shed. Consider sourcing them from local businesses or recycling centers â€" it's environmentally friendly and often cheaper!

Assessing Pallet Condition and Quantity

Before you start, carefully assess each pallet. Check for any signs of rot, insect infestation, or significant warping. Count the number of pallets you need based on your desired shed dimensions â€" remember to account for both the walls and the roof. It’s better to have a few extra on hand for unforeseen repairs or replacements.

Construction: Building a Strong and Stable Structure

With your chosen pallets, you’ll begin construction. Begin by creating a solid base. Consider using concrete blocks or pressure-treated lumber for the foundation to prevent ground moisture from damaging the pallets. Assemble the walls, ensuring the pallets are tightly fitted together. Use sturdy screws and reinforce connections with metal brackets where necessary, especially at corners. Construct the frame using additional lumber for extra strength and support. Consider adding a door frame â€" constructing it from treated lumber will prevent warping and ensure smooth operation of your shed door.

Reinforcing the Framework

Don't underestimate the importance of a robust framework! Using additional lumber to create a supporting structure within the pallet walls will significantly increase the overall strength and stability of your shed. This framework acts as a skeleton, holding the pallets firmly in place and preventing sagging or warping.

Weatherproofing: Protecting Your Investment

This step is crucial for a long-lasting shed. Start by cleaning the pallets thoroughly to remove dirt and debris. Apply a high-quality wood preservative that protects against rot, insects, and moisture. Two coats are highly recommended, allowing each coat to dry completely before applying the next. For the roof, consider using roofing felt or asphalt shingles for maximum protection against rain and snow. Seal any gaps or cracks with weatherproof caulk to prevent water intrusion. A properly sealed roof is essential for keeping your belongings dry.

Choosing the Right Sealants and Finishes

Investing in high-quality wood preservatives and sealants is key. Look for products specifically designed for outdoor use and that offer protection against UV rays, rot, and insects. Consider adding a final coat of weather-resistant paint or stain to enhance the appearance and further protect the wood. Choose colors that reflect sunlight to reduce heat buildup inside the shed.

Final Touches and Maintenance

Once the shed is built and weatherproofed, add the finishing touches. Install a sturdy door, possibly adding hinges and a latch for security. Consider adding windows for ventilation and natural light. Regular maintenance is essential for longevity. Inspect your shed regularly for any signs of damage or wear, addressing issues promptly. Re-apply wood preservative every few years to maintain protection against the elements. With proper care, your pallet shed will become a valuable and enduring addition to your property.

Building a durable pallet shed takes time and effort, but the result is a unique and functional storage solution that will serve you for many years to come. Follow these steps, and enjoy your charming, weather-resistant shed!

Create a Backyard Storage Solution with These Basic Shed Plans

Create a Backyard Storage Solution with These Basic Shed Plans

Conquer Clutter: Build Your Dream Backyard Storage Shed

Is your backyard overrun with lawn equipment, gardening tools, and miscellaneous items? Does the sight of overflowing bins and haphazard piles make you cringe? Then it's time to reclaim your outdoor space with a custom-built storage shed! This guide provides basic shed plans to transform that chaotic corner into an organized haven. We’ll walk you through the process, from initial design to the final touches, empowering you to build the perfect storage solution tailored to your needs and budget.

Planning Your Perfect Shed

Before you even grab a hammer, careful planning is key. Consider these crucial factors: size and dimensions â€" measure your available space and determine the shed’s footprint. Think about the volume of items you need to store and adjust the dimensions accordingly. A small shed might suffice for basic tools, while a larger one can accommodate lawnmowers, bicycles, and seasonal decorations. Next, determine your shed’s style â€" will it be a simple gable roof design, a more complex A-frame, or something else entirely? Explore online resources for inspiration, considering factors like aesthetics and ease of construction. Finally, consider the materials â€" the classic choice is wood, offering versatility and a natural aesthetic. However, metal sheds offer durability and low maintenance, while vinyl sheds provide a weather-resistant option. Choose the material that best suits your skills, budget, and desired aesthetic.

Gathering Your Materials and Tools

With your plans finalized, create a comprehensive materials list. This list should include everything from lumber (pressure-treated is recommended for longevity), roofing materials (shingles, metal, or felt), fasteners (nails, screws, and bolts), and any additional features you’ve included in your design, like windows or a door. Don't forget the essential tools: a measuring tape, saw (circular saw or hand saw), hammer, drill, level, shovel for digging post holes (if applicable), and safety gear, including safety glasses and work gloves. A detailed list will ensure you have everything on hand before you start, minimizing delays and frustration. Consider pre-cutting lumber at a home improvement store if you’re less experienced with carpentry. This can significantly simplify the construction process.

Essential Tool Checklist:

  • Measuring Tape
  • Circular Saw or Hand Saw
  • Hammer
  • Drill with assorted drill bits
  • Level
  • Shovel
  • Safety Glasses
  • Work Gloves

Building Your Shed: Step-by-Step Guide

The construction process will vary based on your chosen design, but the basic principles remain the same. Begin with foundation preparation; this might involve creating a level gravel base, constructing a concrete slab, or setting treated lumber posts in the ground. Next, build the frame, carefully following your plans. Ensure all corners are square and all measurements are accurate. Once the frame is complete, add the roofing, carefully installing your chosen material to ensure proper water runoff. Finally, add the exterior siding, followed by the door and windows. Remember to regularly check your work against your plans and to take breaks if you feel overwhelmed. Building a shed is a project that should be enjoyed, not rushed!

Finishing Touches and Organization

Once your shed is structurally sound, add finishing touches to personalize your storage space. Consider painting or staining the exterior for weather protection and aesthetic appeal. Inside, install shelving for efficient organization. This will allow for better access to stored items. Add lighting for improved visibility in low-light conditions, making it easier to find what you need. Remember, the goal is to create a functional and organized space that helps you manage your outdoor items effectively. With careful planning and execution, your backyard shed will become an invaluable asset, transforming your cluttered outdoor area into a well-organized and visually appealing space.

Create a Rustic DIY Pallet Shed with These Simple and Cost-Effective Plans

Create a Rustic DIY Pallet Shed with These Simple and Cost-Effective Plans

Build Your Own Rustic Pallet Shed: A Simple & Affordable Guide

Tired of overflowing garages and cluttered yards? Dreaming of a charming, rustic storage solution without breaking the bank? Then look no further! This guide provides a step-by-step plan to build your own pallet shed, a project that's both satisfying and surprisingly easy on the wallet. Prepare to transform unused space into a functional and aesthetically pleasing addition to your property.

Gathering Your Materials: The Foundation of Your Pallet Shed

Before you even touch a hammer, carefully gather your materials. This crucial step ensures a smooth building process and minimizes frustrating trips to the hardware store. The beauty of this project lies in its affordabilityâ€"repurposed materials are key! We'll primarily use reclaimed pallets, but be sure to check for any treatments before using them. Some pallets are treated with chemicals that are unsafe for outdoor use or food storage. You’ll also need some basic tools and a few new items.

Essential Materials List:

  • Reclaimed Pallets: Aim for 10-15 sturdy pallets, depending on your desired shed size. Inspect them for rot and damage before using.
  • Concrete Blocks or Pressure-Treated Lumber: For the foundation â€" provides stability and protects the wood from ground moisture.
  • Roofing Material: Choose a cost-effective and weather-resistant option like corrugated metal sheets or asphalt shingles.
  • Screws: Exterior-grade screws are vital for durability. Consider galvanized screws to resist rust.
  • Wood Glue:
  • Reinforces the pallet joints and enhances stability.
  • Hammer, Screwdriver, Drill, Level, Measuring Tape, Saw: Basic tools for construction.
  • Optional: Exterior wood stain or sealant to protect the wood and enhance the rustic look.

Constructing the Pallet Shed Frame: Building the Bones

With your materials assembled, it's time to build the frame. Start by creating a level foundation using your concrete blocks or pressure-treated lumber. This ensures a stable base for your structure. Next, carefully disassemble the pallets, separating usable boards. Inspect each board for soundness and discard any damaged pieces. Using your measurements, construct the walls by screwing together the reclaimed pallet boards, creating a strong and rustic framework. Remember to maintain a consistent gap for ventilation and to check for squareness frequently using your level. Building the frame is like creating a sturdy puzzle, paying attention to detail will yield a satisfying result.

Roofing and Finishing Touches: Adding the Finishing Flourishes

Once the frame stands strong, focus on roofing. This involves measuring and cutting your chosen roofing material to fit your shed's dimensions. Secure the roofing material using appropriate fasteners, ensuring proper overlap for weather protection. Remember, a well-secured roof is crucial for the longevity of your pallet shed. After the roofing, add any finishing touches. This might involve adding a simple door, constructed from remaining pallet wood or other materials. You could also enhance the rustic charm with a coat of weather-resistant stain or sealant. Adding a latch or simple lock will secure your belongings.

Enjoy Your New Rustic Pallet Shed!

Congratulations! You've successfully built your own rustic pallet shed. This cost-effective and environmentally friendly project not only provides valuable storage space but also adds a unique and charming element to your property. Remember that personalization is key; feel free to customize your shed with additional features, like shelves or hanging hooks, to best suit your needs. Enjoy your new outdoor storage space!

Wednesday, November 20, 2024

8x12 Shed Plans with Materials List for Efficient Outdoor Storage

8x12 Shed Plans with Materials List for Efficient Outdoor Storage

Building Your Dream 8x12 Shed: A Complete Guide

So, you're thinking about building an 8x12 shed? That's awesome! A shed of this size is perfect for a ton of uses â€" from storing gardening tools and lawn equipment to housing a workshop or even a small home gym. This guide will walk you through the entire process, from planning to completion, giving you the confidence to build your own efficient outdoor storage solution. We'll cover everything from the detailed plans to a comprehensive materials list, making sure you're well-prepared for every step of the way.

Planning Your 8x12 Shed Project

Before you even think about grabbing a hammer, proper planning is crucial. This phase will save you headaches (and potentially money) down the line. Let's break down the key considerations:

Location, Location, Location!

Choosing the right spot for your shed is paramount. Consider factors like:

  • Accessibility: Will you need a vehicle to access the shed? Ensure there's enough space for easy maneuvering.
  • Sunlight: Do you need a sunny spot for drying tools or a shaded area to protect stored items?
  • Drainage: Avoid low-lying areas prone to flooding. Proper drainage is essential for the longevity of your shed.
  • Utilities: Will you need electricity or water access? Plan accordingly.
  • Local Regulations: Check with your local council for any building permits or restrictions regarding shed construction. This is a crucial step you absolutely shouldn't skip!

Choosing Your Shed Style

There are numerous shed styles to choose from. Do you prefer a simple gable roof, a more elaborate gambrel roof, or a lean-to design? Think about your aesthetic preferences and the overall look you want to achieve. Consider how the style might complement your existing home and landscape.

Drawing Up Your Plans

While you can find pre-made 8x12 shed plans online, creating your own customized plan offers more control. A simple sketch is a great start; even if you're not an architect, you can create a basic plan that details the dimensions, door placement, window placement, and overall structure. Remember to clearly indicate the materials you plan to use.

Materials List for Your 8x12 Shed

This list provides a general guideline; the exact quantities will depend on your specific design and the dimensions of your chosen lumber. Always purchase extra materials to account for potential cuts, mistakes, or unforeseen needs. It's better to have some leftover than to be short!

  • Pressure-treated lumber: 4x4 posts for the foundation, 2x4s for the framing, and 2x6s for the rafters and floor joists. The amount will depend on the height and design, but expect to need a significant quantity.
  • Plywood or OSB sheathing: For the walls, roof, and floor. Again, calculate the surface area to determine the required sheets. Consider using higher-quality plywood for the floor for better durability.
  • Roofing materials: Asphalt shingles, metal roofing, or even recycled materials are options. Choose a material that is weather-resistant and fits your budget.
  • Siding: Vinyl, wood, or metal siding are all possibilities. Your choice will affect both the look and cost.
  • Doors and windows: Select pre-hung doors and windows for easier installation. Measure carefully to ensure a proper fit.
  • Fasteners: A wide variety of screws, nails, and bolts will be needed. Consider using galvanized or stainless steel fasteners for weather resistance.
  • Concrete: For your foundation. You may need to hire professionals for this part of the process.
  • Other essentials: This could include things like paint or stain, sealant, flashing, house wrap, and any necessary hardware for your doors and windows.

Construction Process: A Step-by-Step Guide

Building a shed is a rewarding experience, but it requires careful planning and execution. This is a simplified overview; a more detailed plan will be needed depending on your shed design. Always prioritize safety â€" wear appropriate safety gear and follow building codes.

Foundation

Start by preparing your chosen location. This may involve clearing the ground, leveling the area, and pouring a concrete slab foundation. A proper foundation is critical for the stability and longevity of your shed. Consider whether you need a permit for this work.

Framing

Once the foundation is set, you'll begin framing the walls and roof. Carefully follow your plans, ensuring that all measurements are accurate and that the framing is square and level. This is where precision is key.

Sheathing

After the frame is complete, install the sheathing to the walls and roof. This provides a solid surface for the siding and roofing materials. Ensure all the sheathing is securely fastened and properly aligned.

Siding and Roofing

Now comes the fun part â€" adding the siding and roofing. This will greatly improve the aesthetics and weather resistance of your shed. Carefully follow the manufacturer's instructions for installation. Make sure everything is securely attached and properly sealed.

Finishing Touches

Once the main construction is complete, install the doors and windows, and add any finishing touches like trim, paint, or stain. You might want to add some shelves or organizational tools to make the most of your new storage space.

Commonly Asked Questions

Building a shed can bring up lots of questions. Here are some of the most common ones:

  • Q: Do I need a building permit? A: It depends on your local regulations. Check with your local council or building department to confirm.
  • Q: How long does it take to build an 8x12 shed? A: The timeframe varies depending on experience and complexity, but expect to spend several days to a few weeks.
  • Q: Can I build a shed by myself? A: You can, but having a helper makes the process easier, especially for heavier tasks.
  • Q: How much will it cost to build an 8x12 shed? A: Costs vary greatly depending on the materials used and your labor costs. Budgeting around $1,000 to $5,000 (or even more for higher-end materials and finishes) is a reasonable estimate.
  • Q: What kind of tools do I need? A: You’ll need basic carpentry tools like a saw, hammer, drill, level, measuring tape, and safety glasses.

Building your own 8x12 shed is a fantastic project that will reward you with increased storage and a sense of accomplishment. Remember to take your time, plan carefully, and prioritize safety. Good luck, and enjoy the process!

How to Build a Stunning 8x12 Shed with Unique Features and Flair

How to Build a Stunning 8x12 Shed with Unique Features and Flair

Constructing a Striking 8x12 Shed with Distinctive Features and Aesthetic Appeal

The construction of an 8x12 shed presents a rewarding opportunity to blend functionality with personalized design. This comprehensive guide details the process of building a stunning shed, incorporating unique features to elevate it beyond a mere storage unit. We will explore every phase, from meticulous planning to the final touches, ensuring a structure that reflects both practicality and aesthetic excellence.

I. Planning and Design: Laying the Foundation for Success

Before any construction commences, thorough planning is paramount. This phase involves several crucial steps that will significantly influence the final outcome.

A. Defining the Shed's Purpose and Functionality

The intended use of the shed dictates its internal layout and features. Will it serve as a workshop, a gardening storage area, or a combination thereof? A detailed inventory of items to be stored will inform the necessary shelving, workbenches, and overall space allocation. Consider potential future needs and plan accordingly to avoid limitations down the line. For example, if you envision expanding your workshop capabilities in the future, designing for increased electrical capacity and sufficient workspace becomes crucial.

B. Site Selection and Preparation

Choosing the ideal location is critical. Factors to consider include accessibility, proximity to utilities (if needed), sun exposure (for natural light and ventilation), and drainage. The chosen site requires thorough preparation, involving levelling the ground, removing any vegetation, and potentially adding a compacted gravel base for enhanced stability and drainage. Ensure adherence to local building codes and regulations concerning setbacks and permits.

C. Material Selection: Balancing Aesthetics and Durability

The selection of building materials profoundly impacts both the aesthetic appeal and the longevity of the shed. Pressure-treated lumber provides excellent resistance to rot and insect damage, making it a suitable choice for the framing. For the exterior cladding, options range from traditional wood siding (providing a classic look) to more modern materials such as vinyl or composite siding (offering low-maintenance solutions). Consider the overall style and desired aesthetic when making these selections. Think about complementary colours and textures to ensure a visually cohesive result.

II. Construction: A Step-by-Step Guide to Building the Shed

With the planning phase complete, the construction process can begin. This phase requires precision and attention to detail.

A. Foundation Construction

A solid foundation is the cornerstone of a durable shed. Options include a concrete slab (providing the most robust foundation), concrete piers (cost-effective for well-drained soil), or a compacted gravel base with pressure-treated lumber sill plates (suitable for simpler sheds). The chosen foundation must be level and adequately sized to support the structure's weight.

B. Framing the Walls and Roof

Constructing the frame involves precisely cutting and assembling the lumber according to the plans. Use appropriate fasteners to ensure structural integrity. Proper bracing is essential for stability, especially in areas prone to high winds. Consider adding features such as strategically placed windows for natural light and ventilation, and consider adding pre-hung doors for ease of installation.

C. Exterior Cladding and Roofing

Applying the exterior cladding involves careful installation of the chosen material, ensuring proper overlap and weather sealing. For the roof, select appropriate roofing materials such as asphalt shingles, metal roofing, or even a more unique option like cedar shakes, depending on the desired aesthetic and budget. Proper installation techniques are essential to ensure water tightness and longevity.

III. Incorporating Unique Features and Enhancing the Aesthetic Appeal

This is where the shed transcends the ordinary and becomes truly unique. The following features can transform a standard shed into a stunning structure.

A. Architectural Details

Adding architectural details elevates the shed's aesthetic appeal. Consider incorporating features such as decorative trim, gable vents for added ventilation, and stylish window frames. A carefully designed overhang can protect the exterior walls from the elements and create a visually appealing element. Consider the use of contrasting colours or materials to accentuate these details.

B. Customizable Interior Finishes

The interior finish should reflect the intended use of the shed. For a workshop, consider durable and easy-to-clean materials such as plywood or melamine. For a storage space, shelving units can be customized to fit specific needs. A coat of paint can significantly enhance the overall look and feel of the interior space. Consider using a colour palette that complements the exterior finish.

C. Sustainable and Eco-Friendly Features

Incorporate environmentally conscious materials and practices. Using reclaimed or recycled lumber reduces your environmental impact. Consider adding solar panels to power lights or small appliances, improving energy efficiency. Rainwater harvesting systems can be incorporated to provide a water source for watering plants.

D. Exterior Landscaping and Hardscaping

The surrounding landscape plays a vital role in the overall aesthetic. Consider adding a pathway leading to the shed, planting attractive shrubs or flowers, and perhaps a small patio area for relaxing or working outdoors. These enhancements not only beautify the area but also enhance the shed's functionality and usability.

IV. Final Touches and Finishing Details

The final touches are crucial in creating a finished product that exudes quality and craftsmanship.

  • Caulking and Weatherstripping: Ensure all gaps and seams are properly sealed to prevent water infiltration and drafts.
  • Painting and Staining: Apply a high-quality exterior paint or stain to protect the wood and enhance the aesthetic appeal. Choose colours that complement the surrounding environment.
  • Hardware and Fixtures: Install durable and aesthetically pleasing hardware, such as hinges, handles, and latches.
  • Electrical and Plumbing (if applicable): Ensure all electrical wiring and plumbing installations adhere to safety codes and regulations.
  • Landscaping and Final Clean-up: Complete the landscaping and remove all construction debris.
  • By following these steps, you can build a stunning 8x12 shed that is both functional and aesthetically pleasing, a structure that will serve you well for years to come. Remember that careful planning, attention to detail, and a touch of personal creativity are the keys to success.

    Tuesday, November 19, 2024

    Build a Functional 8x12 Shed with Porch: Plans for Beginners

    Build a Functional 8x12 Shed with Porch: Plans for Beginners

    Building Your Dream 8x12 Shed with Porch: A Beginner's Guide

    So, you're dreaming of that perfect shed â€" a haven for your gardening tools, a workshop for your creative projects, or maybe even a cozy little reading nook. And you want a porch! That's fantastic! Building a shed might seem daunting, but with a little planning and a step-by-step approach, it's totally achievable, even for first-timers. This guide will walk you through building an 8x12 shed with a porch, breaking it down into manageable chunks.

    Planning Your Perfect Shed

    Before you even think about grabbing a hammer, you need a solid plan. This isn't just about slapping some wood together; it’s about creating a structure that's sturdy, functional, and aesthetically pleasing. Let's get started!

    Choosing Your Location

    Think carefully about where your shed will live. Consider sun exposure (do you want a sunny spot for drying herbs or a shady one for delicate tools?), access to electricity (if you plan on having power), and proximity to your house. Make sure you check local building codes and regulations regarding shed placement; you might need a certain distance from property lines or easements.

    Designing Your Shed & Porch

    An 8x12 shed offers a good amount of space, but you want to maximize it. Think about the things you'll store inside: Will you need shelves? Workbenches? Consider adding windows for natural light and ventilation. Your porch can add extra space for seating or plant storage. Sketch out your shed on paper, including dimensions for the porch. A simple sketch is fine; the goal is to visualize the layout.

    Gathering Your Materials

    Creating a detailed materials list is crucial. This will prevent last-minute trips to the hardware store. You’ll need pressure-treated lumber for the foundation, framing, and exterior walls. Consider using cedar or redwood for a more aesthetically pleasing (and naturally rot-resistant) look. Don't forget:

    • Pressure-treated lumber (various sizes)
    • Roofing materials (shingles, felt paper)
    • Siding (vinyl, wood, metal)
    • Doors and windows
    • Hardware (nails, screws, hinges, etc.)
    • Concrete mix (for the foundation)
    • Fasteners appropriate for your chosen siding and roofing materials
    • Optional: Paint or stain

    It's a good idea to visit a home improvement store and get a detailed estimate before purchasing everything. They can often help you refine your materials list.

    Building the Foundation

    A solid foundation is the key to a long-lasting shed. Here's a straightforward approach:

    Leveling the Ground

    Use a shovel and rake to remove any grass, weeds, rocks, and loose soil from the area where your shed will stand. Level the ground using a spirit level and shovel until you have a perfectly flat surface. This is very important!

    Creating the Concrete Base

    For an 8x12 shed, a concrete slab is ideal. Mark out the area using stakes and string, then excavate to a depth of 4-6 inches. Place a layer of gravel for drainage, then pour the concrete according to package instructions. Use a screed to ensure a perfectly level surface and allow it to cure for at least 24 hours before proceeding.

    Framing the Shed

    Framing is where the structure of your shed really takes shape. Follow these steps:

    Building the Floor Frame

    Construct a frame from pressure-treated lumber using 2x6s or 2x8s. Screw the pieces together securely, ensuring the frame is square and level. Then, add floor joists spaced 12-16 inches apart. Lay down your plywood subflooring.

    Erecting the Walls

    Build wall frames using 2x4s, following the dimensions you planned earlier. Remember to account for doors and windows. Securely attach the wall frames to the floor frame, ensuring they are plumb (perfectly vertical).

    Raising the Roof

    Choose a roof designâ€"a simple gable roof is easiest for beginners. Construct the roof trusses (pre-made trusses are readily available and simplify this step). Carefully lift and attach the trusses to the top plates of the wall frames, ensuring they are properly aligned.

    Adding the Finishing Touches

    Now for the fun part â€" adding the finishing touches to your shed!

    Installing the Siding

    Once the framing is complete, you can install your chosen siding. Follow the manufacturer's instructions for installation. This is where your shed's personality really shines through! Choose a color and style that matches your landscaping.

    Roofing

    Install roofing felt over the roof trusses to protect against leaks. Then, lay your chosen roofing shingles, following the manufacturer's instructions. Ensure proper overlap for a watertight seal.

    Adding Doors and Windows

    Install your doors and windows using appropriate hardware. This step is fairly straightforward, but ensure you use the right size screws and hinges to ensure security and proper functionality.

    Building the Porch

    Your porch adds charm and functionality. Build a simple frame using pressure-treated lumber, attach it securely to the shed, and add a floor (using the same plywood technique as the shed floor). Then, add railings for safety. You can even add a roof to the porch to create a sheltered area.

    Finishing Up

    Congratulations! You've built your shed! Remember to clean up any debris and give your new shed a final inspection. Add any interior features you plannedâ€"shelving, benches, etc. Enjoy your new space!

    Commonly Asked Questions

    Q: How long does it take to build an 8x12 shed?

    A: This varies greatly depending on your experience level, the complexity of your design, and the time you can dedicate to the project. A beginner might take several weekends, while an experienced builder could complete it in a week.

    Q: Do I need a building permit?

    A: Check with your local building department. Most jurisdictions require permits for structures of a certain size. It’s better to be safe than sorry.

    Q: What kind of tools do I need?

    A: You'll need basic hand tools like hammers, screwdrivers, measuring tape, levels, and saws. Power tools like a drill, circular saw, and nail gun will significantly speed up the process.

    Q: Can I build this shed alone?

    A: It's possible, but having a helper, especially for lifting and positioning heavier components, will make the job much easier and safer.

    Q: What if I make a mistake?

    A: Don't worry, everyone makes mistakes! Take your time, double-check your measurements, and don't be afraid to ask for help. Most mistakes are correctable.

    Remember, building a shed is a rewarding experience. Enjoy the process and take pride in your accomplishment!

    Complete 8x12 Shed Plans and Materials List for Backyard Storage

    Complete 8x12 Shed Plans and Materials List for Backyard Storage

    Build Your Dream 8x12 Backyard Shed: Complete Plans and Materials List

    Tired of clutter piling up in your garage or overflowing from your closets? A backyard shed offers the perfect solution for organized storage, freeing up valuable space in your home. This comprehensive guide provides detailed plans and a materials list to help you build your own sturdy and attractive 8x12 shed. We'll walk you through each step, ensuring you have everything you need for a successful project.

    I. Planning Your 8x12 Shed

    Before you pick up a hammer, careful planning is crucial. Consider your specific needs. What will you store in your shed? This will determine the layout and features. Will you need shelving? Do you require electricity? Think about the location â€" ensure you have sufficient space and check local building codes and regulations regarding shed placement, size, and permits. Sketch a basic plan, noting the door location (consider double doors for larger items), window placement for natural light, and any other features you desire. This preliminary planning phase will save you time and frustration later.

    A. Choosing Your Materials

    Selecting high-quality materials is paramount for building a durable and long-lasting shed. Pressure-treated lumber is a wise choice for the floor and foundation, offering resistance to rot and insects. For the walls and roof, consider using exterior-grade plywood or tongue-and-groove boards. Your choice of roofing material (e.g., asphalt shingles, metal roofing) will influence your overall budget and aesthetic. Remember to factor in the cost of fasteners, concrete for the foundation, and any additional features like windows and doors.

    II. Foundation and Floor Construction

    Start by preparing a level foundation. A concrete slab is ideal for stability, but a gravel base with pressure-treated lumber sleepers is a cost-effective alternative. Once your foundation is set, build a sturdy floor frame using pressure-treated lumber. This frame will support the floor sheathing. Ensure all joints are properly secured with appropriate fasteners, creating a strong and level base for your shed.

    A. Essential Tools

    Gather your tools before you begin construction. You'll need basic carpentry tools such as a measuring tape, level, saw (circular saw is highly recommended), drill, hammer, screwdrivers, and a nail gun (optional, but highly recommended for efficiency). Safety gear is essential â€" always wear safety glasses, work gloves, and appropriate footwear.

    III. Wall and Roof Framing

    Construct the wall frames using pressure-treated lumber for the bottom plates and standard lumber for the studs. Ensure the frames are square and plumb using a level and speed square. Attach the exterior sheathing (plywood or tongue-and-groove boards) to the frames, ensuring proper alignment and fastening. For the roof, construct trusses or rafters, depending on your design, and attach them securely to the top plates of the walls. Finally, install the chosen roofing material following manufacturer instructions.

    IV. Doors, Windows, and Finishing Touches

    Install your doors and windows, ensuring a snug fit and proper weather sealing. This prevents drafts and protects your stored items from the elements. Finish the exterior with paint or stain to enhance the shed's appearance and provide added protection against the weather. Consider adding trim work for a more polished look.

    V. Detailed Materials List

    This list provides estimated quantities. Adjust based on your specific design and chosen materials. Remember to check local building codes and adjust accordingly.

    • Pressure-treated lumber: Approximately 150 linear feet for foundation and floor framing.
    • Standard lumber: Approximately 300 linear feet for wall and roof framing.
    • Exterior-grade plywood or tongue-and-groove boards: Sufficient for wall and roof sheathing.
    • Roofing material: Asphalt shingles, metal roofing, or other chosen material â€" calculate based on roof area.
    • Doors: One or two depending on your design.
    • Windows: Based on your design preferences.
    • Fasteners: Nails, screws, and other appropriate fasteners.
    • Concrete (optional): For a concrete slab foundation.
    • Gravel (optional): For a gravel base foundation.
    • Paint or stain: For exterior finishing.
    • Hardware: Hinges, handles, window latches.

    Note: This materials list is a guideline. Always double-check your measurements and adjust quantities as needed. Consulting with a local lumber yard can help refine your estimate. Building your own shed is a rewarding experience that offers years of dependable storage. Enjoy the process and the results!

    How to Build a 6x8 Gable Shed: Step-by-Step DIY Plans

    How to Build a 6x8 Gable Shed: Step-by-Step DIY Plans

    Building Your Dream 6x8 Gable Shed: A Step-by-Step DIY Guide

    So, you're thinking about building a shed? Fantastic! A 6x8 gable shed is a perfect size for a beginner DIYer, offering ample storage without being overwhelmingly complex. This guide will walk you through the process, step-by-step, in a way that's hopefully both informative and easy to understand. Grab your coffee, let's get started!

    1. Planning and Preparation: The Foundation of Success

    Before you even think about touching a single nail, some planning is crucial. This isn't rocket science, but skipping this phase often leads to headaches down the line.

    1.1 Choosing Your Location

    Where will your glorious shed reside? Consider factors like:

    • Accessibility: Do you have a clear path to get your materials to the site?
    • Sunlight and Shade: Think about how much sun exposure you want. Too much sun can lead to overheating, while too little might encourage dampness.
    • Drainage: Avoid low-lying areas prone to flooding. You want a nice, level spot.
    • Local Regulations: Check with your local council or homeowner's association about building permits and setbacks (minimum distance from property lines).

    1.2 Gathering Your Materials

    Making a detailed list is key. You don't want to be halfway through the project and realize you're missing a crucial piece! Here's a basic list (quantities depend on your design, so adjust accordingly):

    • Pressure-treated lumber (4x4 posts for the foundation, 2x4s for the framing, 2x6s for the rafters)
    • Plywood or OSB sheathing for the walls and roof
    • Roofing material (shingles, metal, etc.)
    • Nails, screws, and other fasteners
    • Concrete mix (for a concrete foundation - optional, but recommended)
    • Door and window materials (if desired)
    • Exterior paint or stain (optional)
    • Level, measuring tape, saw, hammer, drill, and other basic tools.

    Consider buying slightly more materials than you need â€" it's better to have leftovers than to run short and have to make a mid-project trip to the hardware store!

    2. Building the Foundation: A Solid Start

    A sturdy foundation is essential. While you can get away with a simpler base on very stable ground, a concrete slab is highly recommended.

    2.1 Preparing the Ground

    Clear the chosen location of any vegetation, rocks, or debris. Level the ground as much as possible using a shovel and rake. Mark out the dimensions of your shed (6ft x 8ft) using stakes and string.

    2.2 Pouring the Concrete Slab (Optional, but Recommended)

    Dig a shallow foundation trench (about 4-6 inches deep), adding gravel for better drainage if your soil is particularly clay-like. Create a formwork using wood planks to contain the concrete. Pour the concrete mix, ensuring it's level. Let it cure for at least 24-48 hours before proceeding.

    3. Framing the Walls and Roof: The Structure Takes Shape

    This is where the fun begins! We'll construct the walls and the roof frame, creating the basic skeleton of your shed.

    3.1 Building the Wall Frames

    Cut your 2x4s to the appropriate lengths for the wall frames. Assemble them using appropriate fasteners, ensuring square corners using a speed square. Remember to leave openings for your door and windows, if applicable. Repeat this for all four walls.

    3.2 Raising the Walls

    Carefully lift the wall frames into position on your foundation. Secure them temporarily with bracing to ensure stability before nailing them firmly in place.

    3.3 Constructing the Roof Frame

    Construct the roof trusses (triangular roof supports) using 2x6 lumber. There are several ways to create trusses, so research the best method for your skills and materials. Attach the trusses to the top plates of the wall frames, ensuring they are properly aligned and spaced.

    4. Sheathing and Roofing: Weather Protection

    Now it's time to protect your hard work from the elements!

    4.1 Applying the Wall Sheathing

    Cover the exterior of the wall frames with plywood or OSB sheathing. Ensure proper overlapping and secure fastening for a solid, weather-resistant surface.

    4.2 Installing the Roofing

    Install your chosen roofing material according to the manufacturer's instructions. This will likely involve laying down underlayment for added protection before applying the shingles or other roofing material.

    5. Finishing Touches: Adding the Finishing Touches

    The finishing touches transform your basic shed into a functional and attractive storage space.

    5.1 Installing Doors and Windows

    If you have chosen to include them, carefully install your doors and windows, ensuring they are properly sealed and weatherproof.

    5.2 Adding Trim and Fascia

    Enhance the look and weather protection of your shed with trim around doors, windows, and along the roofline. Install fascia boards along the edges of the roof.

    5.3 Painting or Staining (Optional)

    Protect and beautify your shed by applying a coat of exterior paint or stain. This not only improves aesthetics, but also adds an extra layer of weather protection.

    Commonly Asked Questions

    Q: Do I need a building permit?

    A: This depends on your local regulations. Check with your local council or homeowner's association before starting your project.

    Q: What type of foundation is best?

    A: A concrete slab is the most durable and recommended, especially if you live in an area with variable weather conditions. However, a simple gravel base might suffice for smaller, less substantial structures.

    Q: What kind of wood should I use?

    A: Pressure-treated lumber is highly recommended for its resistance to rot and insects, especially for the foundation and parts in direct contact with the ground.

    Q: How long will it take to build?

    A: The time needed depends on your experience and the complexity of your design. Allow for several days, possibly a weekend per major step. Don't rush the process!

    Q: Can I do this alone?

    A: While possible, having a helper, especially during the wall-raising and roofing stages, will make the process significantly easier and safer.

    Remember, building a shed is a rewarding experience. Take your time, follow safety guidelines, and don’t be afraid to ask for help if you need it. Enjoy the process and the satisfaction of creating something with your own two hands!

    6x8 Shed Roof Plans: Tips and Ideas for DIY Builders

    6x8 Shed Roof Plans: Tips and Ideas for DIY Builders

    6x8 Shed Roof Plans: Tips and Ideas for DIY Builders

    So, you're thinking of building a 6x8 shed? That's awesome! A small shed is a fantastic project for a DIY enthusiast, and a shed roof is arguably the easiest roof type to tackle. This guide will walk you through everything you need to know to build your own 6x8 shed with a shed roof, offering tips and tricks to make the process smoother and more successful.

    Planning Your 6x8 Shed

    Before you even think about grabbing a hammer, you need a solid plan. This isn't some slapdash project; a bit of upfront planning will save you headaches (and potentially money) down the line.

    Choosing Your Location

    Where are you going to put your shed? Consider these things:

    • Accessibility: Will you need to drive a vehicle close to the site for materials delivery?
    • Sun and Shade: Think about the sun's path throughout the day. Do you want a sunny shed, or one mostly in the shade?
    • Drainage: Ensure the ground slopes away from the shed to avoid water pooling around the foundation.
    • Local Regulations: Check with your local council or homeowner's association for any building permits or restrictions. Don't skip this step!

    Designing Your Shed

    A 6x8 shed is pretty compact, so you need to think carefully about what you'll store in it. Sketch out a rough plan indicating where you'll place shelves, hanging racks, or any other storage solutions you plan to add. Consider the height you want your shed to be. Taller sheds require more materials and are more challenging to build, but they offer more usable space. A 6x8 shed with a 7ft or 8ft height is manageable for many DIYers.

    Gathering Your Materials

    This is where a detailed plan really pays off. You don't want to be halfway through the build and realize you're missing crucial materials. Create a comprehensive list that includes:

    • Pressure-treated lumber for the base and frame (consider using 4x4 posts for extra sturdiness)
    • Plywood or OSB for the walls and roof
    • Roofing material (shingles, metal, etc.) â€" choose something lightweight for a small shed.
    • Nails, screws, and other fasteners
    • Concrete for the foundation (or alternatives like gravel pads)
    • Exterior paint or sealant (optional, but recommended to protect the wood)
    • Tools (saw, hammer, level, measuring tape, etc.)

    Building the 6x8 Shed

    Now for the fun part! Remember, safety first. Wear appropriate safety gear throughout the process. If you're uncomfortable with any aspect of the build, don't hesitate to seek help from a more experienced builder.

    Foundation

    A solid foundation is critical. You can opt for a concrete slab, concrete piers, or even a gravel base. For a 6x8 shed, a gravel base is often sufficient, especially if the ground is well-drained. Ensure the base is perfectly level â€" this is paramount to a square shed. Use a level constantly throughout the construction to verify that your walls and roof are square and plumb.

    Framing the Walls

    Cut your lumber according to your plan and assemble the wall frames. Use appropriate bracing to ensure rigidity. Always double-check your measurements as you go. Once the frames are assembled, ensure they are square and plumb before attaching them to the foundation.

    Building the Shed Roof

    This is where the shed roof's simplicity shines. For a 6x8 shed, you can often use 2x4s or 2x6s for the rafters. Remember that these rafters will need to be cut at the correct angle (depending on the desired roof slope). Using a speed square or a roof pitch calculator app is really handy here. Ensure the rafters are equally spaced and well-secured to the top plates of the walls.

    Once the rafters are in place, add plywood or OSB sheathing to create a solid roof deck. This sheathing provides a stable base for your roofing material. After ensuring the sheathing is securely fastened, it's time to add your chosen roofing material â€" shingles are a popular and relatively inexpensive choice for sheds.

    Finishing Touches

    Once the roof is complete, you can add siding, windows, and a door. Remember that a 6x8 shed may not accommodate all features, so prioritize the most useful ones. Once everything is in place, consider painting or sealing the exterior to protect the wood from the elements. This will significantly extend the life of your shed.

    Tips for Success

    • Take your time: Rushing the process can lead to mistakes. Work methodically and carefully.
    • Measure twice, cut once: This old adage is especially important in shed construction.
    • Use the right tools: Investing in good quality tools will make the job easier and more accurate.
    • Ask for help: Don't be afraid to ask for assistance from friends or family, especially for heavier tasks.
    • Check your work frequently: Ensure everything is square and level as you go. This will prevent problems later on.

    Commonly Asked Questions

    Here are some questions frequently asked about 6x8 shed construction:

    Q: Do I need a building permit for a 6x8 shed?

    A: It depends on your local regulations. Check with your local council or homeowner's association before starting the project.

    Q: What kind of foundation is best for a 6x8 shed?

    A: A gravel base is often sufficient for smaller sheds, but a concrete slab or piers provide a more robust foundation.

    Q: What type of wood should I use?

    A: Pressure-treated lumber is recommended for its durability and resistance to rot and insects.

    Q: How much does it cost to build a 6x8 shed?

    A: The cost varies depending on materials and labor. You can expect to spend anywhere from a few hundred dollars to a couple of thousand, depending on your choices.

    Q: How long does it take to build a 6x8 shed?

    A: With experience, a 6x8 shed can be built in a weekend. Allow more time if you're a beginner or working alone.

    Building your own 6x8 shed is a rewarding experience. By following these plans and tips, you can create a valuable addition to your property. Remember to be patient, take your time, and enjoy the process!

    Space-Saving 8x12 Shed with Loft: DIY Plans for Small Yards

    Space-Saving 8x12 Shed with Loft: DIY Plans for Small Yards

    Space-Saving 8x12 Shed with Loft: DIY Plans for Small Yards

    So, you've got a tiny yard, but a mountain of stuff that needs storing? Or maybe you’re dreaming of a cozy garden getaway, but lack the square footage? Don't despair! Building your own 8x12 shed with a loft is totally achievable, even in the tightest of spaces. This project might seem daunting at first, but trust me, with some planning and elbow grease, you can have the extra storage and maybe even a little workshop you've always wanted.

    Why an 8x12 Shed with Loft?

    An 8x12 shed is the sweet spot for small yards. It’s big enough to be seriously useful but small enough to not overwhelm your space. Adding a loft doubles your storage capacity without increasing the footprint! Think of all the possibilities:

    • Extra storage: Seasonal items, garden tools, sporting equipment â€" it all fits!
    • Workshop space: Set up a workbench downstairs and use the loft for storing supplies.
    • Cozy garden retreat: Add a comfy chair and some fairy lights, and you have a little escape in your backyard.
    • Guest room alternative (for a *very* small guest!): In a pinch, the loft could even serve as a temporary sleeping space for a small child or a pet.

    Planning Your DIY Shed Project

    Before you even think about grabbing a hammer, meticulous planning is key. This isn't just about throwing some wood together; we're aiming for a sturdy, safe, and aesthetically pleasing structure. Here's what you need to consider:

    Local Regulations and Permits

    This is CRUCIAL. Check with your local council or homeowner's association. They'll have regulations about shed size, placement, materials, and whether or not you need a permit. Ignoring this can lead to hefty fines or even having to tear down your hard work.

    Site Preparation

    Level ground is paramount. You'll need to clear the area, remove any vegetation, and level the ground. A slight slope is manageable, but significant unevenness will cause problems later. Consider using a laser level for precision.

    Choosing Your Materials

    Pressure-treated lumber is a must for the base and frame to withstand the elements. For the siding, you've got options! Vinyl is low maintenance, but wood offers a more classic look. Consider your budget and aesthetic preferences. For the roof, asphalt shingles are a popular and relatively inexpensive choice.

    Designing Your Loft

    The loft design depends on your needs. Think about the height you need for comfortable access. A standard loft height of around 4-5 feet is generally a good starting point. You’ll also need to consider the load-bearing capacity of the floor joists to ensure it can support whatever you plan to store up there.

    Building Your 8x12 Shed: A Step-by-Step (Simplified!) Guide

    This is a HUGE undertaking and we can't possibly cover every single detail here. However, I can give you a general overview of the steps involved:

    1. Foundation: Prepare a concrete slab or gravel base. This provides a level and stable foundation for your shed.
    2. Framing the Floor: Build a sturdy floor frame using pressure-treated lumber. Make sure it's perfectly square.
    3. Framing the Walls: Construct the wall frames, ensuring they’re plumb (perfectly vertical). You'll likely want to use pre-cut lumber to speed up the process.
    4. Raising the Walls: Carefully raise the wall frames and secure them to the floor frame. Get help with this step â€" it's easier with extra hands!
    5. Installing the Roof Trusses or Rafters: This is another crucial step that needs to be done carefully. Proper roof framing ensures the structural integrity of your shed.
    6. Sheathing the Roof: Attach plywood sheathing to the roof trusses or rafters to create a solid surface for the shingles.
    7. Roofing: Install the asphalt shingles according to the manufacturer's instructions.
    8. Siding: Cover the exterior walls with your chosen siding material. Consider adding window(s) for ventilation and light.
    9. Loft Construction: Build the loft floor and frame using sturdy lumber. Ensure it's securely attached to the walls.
    10. Finishing Touches: Install doors, windows, and any other desired features. Add interior shelving or hanging organizers.

    Remember, safety first! Always use appropriate safety equipment, including safety glasses, gloves, and hearing protection. If you're unsure about any step, consult with an experienced builder or watch detailed tutorials on YouTube.

    Finding Help and Resources

    Don't feel like you have to do this alone! There are tons of resources available to help you build your dream shed:

    • YouTube Tutorials: Search for "building an 8x12 shed with loft" â€" you'll find countless videos detailing the entire process.
    • Online Plans: Many websites offer detailed DIY shed plans, often for a small fee. These plans provide precise measurements and instructions.
    • Local Lumber Yards: The staff at your local lumber yard can offer valuable advice on materials and construction techniques.
    • Friends and Family: Enlist the help of friends or family, especially for the more challenging steps like raising the walls.

    Commonly Asked Questions

    Here are some questions people frequently ask about building an 8x12 shed with a loft:

    Q: How much will it cost to build an 8x12 shed with a loft?

    A: The cost varies significantly depending on materials, location, and your level of DIY skill. You can expect to spend anywhere from $2,000 to $6,000 or more.

    Q: How long will it take to build?

    A: This depends on your experience and how much time you can dedicate to the project. It could take a weekend warrior several weeks or even months, while a seasoned DIYer might complete it in a couple of weeks.

    Q: Do I need any special tools?

    A: You'll need a basic set of woodworking tools, including a saw, hammer, drill, level, measuring tape, and possibly a nail gun. Renting some specialized tools might save you money in the long run.

    Q: Can I build the shed myself, or should I hire someone?

    A: Whether you can build it yourself depends on your experience and comfort level with construction. If you're not comfortable with DIY projects, it’s best to hire a professional. Building a shed is a significant undertaking.

    Building your own 8x12 shed with a loft is a rewarding experience. While it's a significant project, the sense of accomplishment and the added space will make it all worthwhile. Remember to plan carefully, prioritize safety, and enjoy the process!